

Installing and Updating BiXBiT Firmware on Antminer Devices
The downloaded firmware archive contains the file installer_tool.exe – this program is used to install the BiXBiT firmware. Before running the file, you must first extract the firmware archive. This can be done using the standard Windows tools (for Windows 11) or any third-party archiver, such as WinRAR.
List of Compatible Models
| Antminer Model | Hashboard Model |
|---|---|
| Antminer L11 | A3SL53801 |
| Antminer L7 | BSL39601 |
| Antminer L9 | BSL41601 |
| Antminer S19 | BHB42801, BHB42803, BHB42811, BHB42821, BHB42831, BHB42841, NBS1902 |
| Antminer S19 Hydro | HHB28601 |
| Antminer S19 Pro | BHB42641, BHB42651 |
| Antminer S19 Pro Hyd. | HHB42602 |
| Antminer S19 Pro-A | NBP1901 |
| Antminer S19 Pro+ Hyd. | HHB42601, HHB42631, HHB42701, HHB42711, TH401 |
| Antminer S19 XP | BHB56601, BHB56701, BHB56801, BHB56802, BHB56806 |
| Antminer S19 XP+ | BHB68707, BHB68709 |
| Antminer S19 XP+ Hyd. / Hydro | HHB68701, HHB68703, HHB68704 |
| Antminer S19a | BHB28611 |
| Antminer S19a Pro | BHB28501 |
| Antminer S19e XP Hyd. | H6HB56702 |
| Antminer S19i | NBS2003 |
| Antminer S19j | BHB42701 |
| Antminer S19j Pro | BHB42601, BHB42603, BHB42621, BHB42631 |
| Antminer S19j Pro+ | BHB42611, BHB42612 |
| Antminer S19j XP | BHB56804, BHB56807 |
| Antminer S19j+ | BHB42701 |
| Antminer S19k Pro | BHB56901, BHB56902, BHB56903, BHB56907, TS007 |
| Antminer S21 | BHB68601, BHB68603, BHB68606 |
| Antminer S21 Hyd. / Hydro | HHB68501, HHB68502, HHB68503, HHB68504, HHB68505, HHB68601, HHB68602 |
| Antminer S21 Imm. | IHB68601 |
| Antminer S21 Pro | A3HB70601, A3HB70602, A3HB70603 |
| Antminer S21 XP | A3HB70501, A3HB70502, A3HB70503 |
| Antminer S21 XP Hyd. | H6HB70501, H6HB70502, H6HB70601 |
| Antminer S21 XP Imm. / XPImm | M1HB70602 |
| Antminer S21+ | A3HB70701, A3HB70702, A3HB70703 |
| Antminer S21+ Hyd. / Hydro | H6HB70701, H6HB70702, H6HB70704 |
| Antminer S21e Hyd. | H6HB70801, H6HB70802 |
| Antminer S21e XP Hyd. | H6HB70602 |
| Antminer T19 | NBT1903 |
| Antminer T21 | BHB68701, BHB68703, BHB68705 |
| Antminer BHB42XXX | — |
| Antminer H6HB70701 | — |
| Antminer HHB68XXX | — |
Known Issues
- Operation of the S19 Pro+ Hyd. device with hashboards HHB42701, HHB42711, and TH401 is not guaranteed due to the lack of testing on devices with these hashboard models. If you encounter unstable operation on devices with the above-mentioned boards, please contact technical support.
- Operation of Antminer S21+ Hydro, Antminer S21 XP Hyd., and Antminer S21e XP Hyd. devices at settings above factory defaults is not guaranteed due to the lack of stress testing for these devices. If you encounter unstable operation, please contact technical support.
- On devices with CV control boards, the Restore factory settings function resets the firmware to the factory version.
- Installation on the L11 device with firmware FR-1.3(251211-L11&L11 Pro) or newer is not available.
- Switching the network connection type on the device from Static to DHCP causes the device to freeze. This can only be resolved by powering the device off and on (reboot).
Running and Initial Configuration of the Installer
- Open the folder where the archive was extracted and run the installer_tool.exe file.
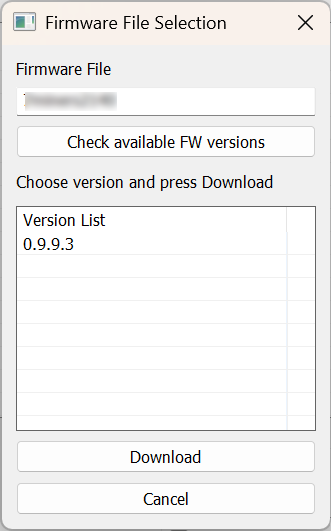
- In the Firmware File Selection window that appears, you can:
- Enter your partner ID in the Firmware File field and click the Check Available FW versions button. You will then be able to select one of the available firmware versions and download it by clicking the Download button – the firmware downloaded this way will be used for installation.
- Click the Cancel button – the installer will then use the files that were originally in the same archive with it (local files).
- The main program window will then open:
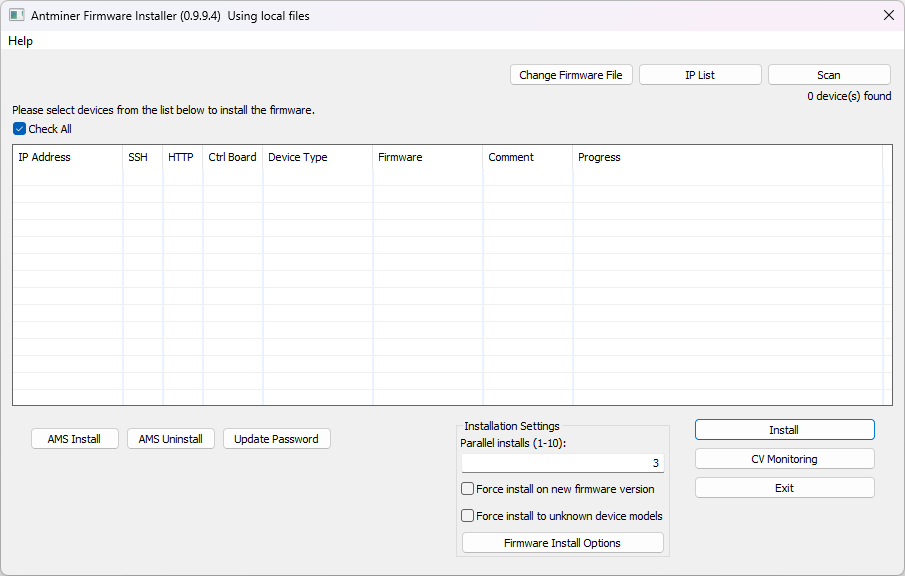
- Click the IP List button to set the network scan range for finding the devices you want to flash.
- In the Info window that appears:
- If you click Yes, the starting and ending IP addresses of the subnet you are connected to will be automatically added to the installer's range list. This can be useful if the computer from which the devices will be flashed is on the same subnet as the devices being flashed.
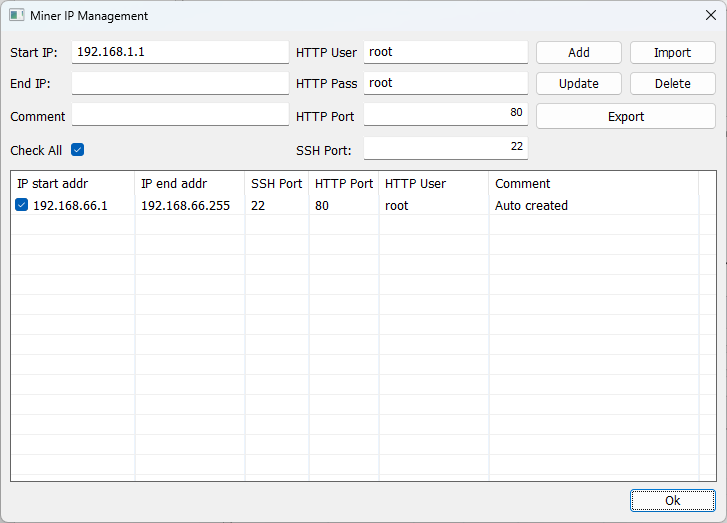
- If you click No, an empty Miner IP Management window will open, where you will need to manually enter the data for the network scan.
- To manually add a network scan range, follow these steps:
- Start IP. Set the starting IP address of the scan range.
- End IP. Set the ending IP address of the scan range. If you only need to add a single IP address instead of a range, this field can be left blank.
- HTTP User. Specify the username for the miner's web interface.
- HTTP Pass. Specify the password for the miner's web interface.
- Comment. Set a name for this range (optional).
- Then click the Add button to add the specified range.
INFO
When adding multiple ranges, be careful that the IP addresses in them do not overlap, as the program will not allow saving a new range in that case.
- Select the required ranges using the checkboxes and click OK.
- After that, in the main program window, click the Scan button and wait for the network scan to complete.
Installing BiXBiT Firmware on Devices
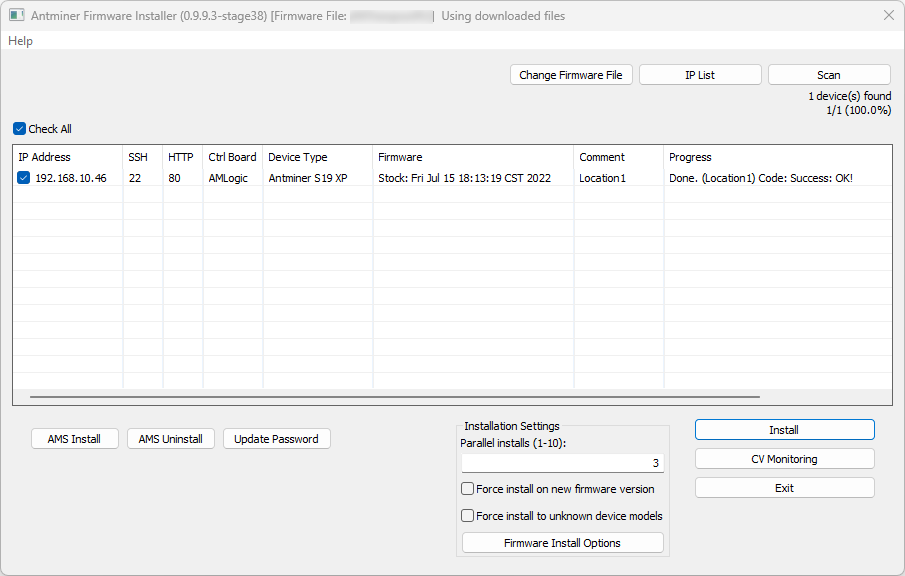
- Use the checkboxes to select the devices you want to flash.
- In the Installation Settings block, you can additionally specify the following options before flashing:
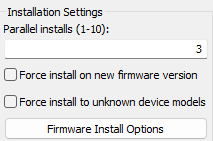
- Parallel Installs – specify the number of devices to flash simultaneously (from 1 to 10).
- The Force install on new firmware version checkbox allows you to install an older version of BiXBiT firmware compared to the one already installed on the device.
- The Force install to unknown device models checkbox allows you to try installing the firmware even if the device model was not correctly identified.
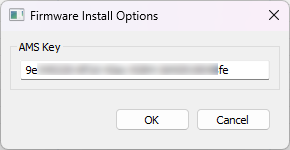
- When you click the Firmware Install Options button, a field will appear for entering the AMS key (AMS API key) – if you enter it, the devices will appear in AMS almost immediately after the firmware installation, and you will not need to set the API key additionally.
- Click the Install button. If the device is flashed successfully, a message with the content “Done. Code: Success: OK!” or “Done. Code: CV: Installed” will appear in the Progress field. After that, you can close the program.
WARNING
Important: after installing the firmware on devices with CVtek boards, it is recommended to use the “CV Monitoring” button – this will automatically restore the BiXBiT firmware on such devices after they are rebooted:
- Select the devices with CVtek boards using the checkboxes.
- Click the “CV Monitoring” button.
- The installer must remain constantly running and be on the same network as the devices.
After performing these steps, the installer will periodically check whether the firmware is installed on devices with CVtek boards and restore it if necessary.