

Basic ASIC Miner Configuration
Required Hardware
- Power supply network, wiring, and circuit breakers (protective devices) that match the device's specifications.
- A router with internet access.
- A computer connected to this router.
- An Ethernet cable ("twisted pair"/"patch cord") to connect the ASIC miner to this router.
- In some cases, a microSD card may be needed. It is recommended to use SD cards with a capacity from 8 GB to 16 GB inclusive. For devices whose control boards are equipped only with a MicroUSB port, an additional adapter and card reader will be required.
INFO
The device does not have a wireless communication module and requires an Ethernet cable connecting it to the router/switch/modem on the network. Important: your computer must be on the same local network as the ASIC miner.
Required Software
For Whatsminer Devices:
- WhatsMinerTool. You can download the latest version of WhatsMinerTool from: WhatsMinerTool. Using outdated versions may result in unsuccessful firmware installation.
- BiXBiT firmware corresponding to your Whatsminer device.
- Any Internet browser.
For Antminer Devices:
- BTC Tools. You can download the latest version of BTC Tools from: https://btc-tools.org/
- BiXBiT firmware corresponding to your Antminer device.
- IPReporter.exe. For cases when you do not know the device's IP address: IP Reporter.zip
- Any Internet browser.
Connecting the Device
Before turning it on, make sure your electrical network, wiring, and circuit breakers correspond to the device's power consumption.
WARNING
The device does not have a power button. The device starts working immediately when connected to the mains, and typically, there is a brief power surge ("spike"). It is strongly recommended not to connect the device by plugging it directly into a live socket to avoid damaging the power connectors, plug, and socket. If possible, provide each device with a dedicated circuit breaker and turn the device on using it.
- Connect the power cable to the device. Ensure the connection is secure.
- Connect one end of the Ethernet cable to the corresponding port on the device, and the other end to an available port on the router/switch/modem.
- Insert the power cable plug into the socket and supply power to the device by turning on the circuit breaker.
- Make sure the device's fans start spinning and the LED indicators turn on. Also, after a few seconds, the indicators on the Ethernet port should light up and blink.
INFO
If the fans do not start and the LEDs do not turn on — check the device's power supply. If the device turns on, but the Ethernet indicators do not work — make sure the router/switch is on, and the network cable is functional and properly connected.
Determining the ASIC Miner's IP Address on the Network
For Whatsminer Devices:
- Run the WhatsMinerTool utility.
- Click the [ IP Monitor ] button ①.
- In the "Detect and Bind IP" window that opens, click the [ Start ] button ②.

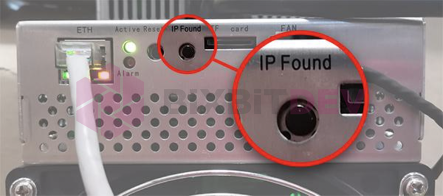
- On the device's control panel, press and hold the IP found button until the green and red LEDs blink together several times.
- A line with your miner should appear in the Detect and Bind IP window. Pay attention to the Source IP column (e.g., 192.168.10.142) — remember this address.

- Close this window and confirm closing (click [OK] in the pop-up window).
Now you need to add the network scan range for the WhatsMinerTool utility:
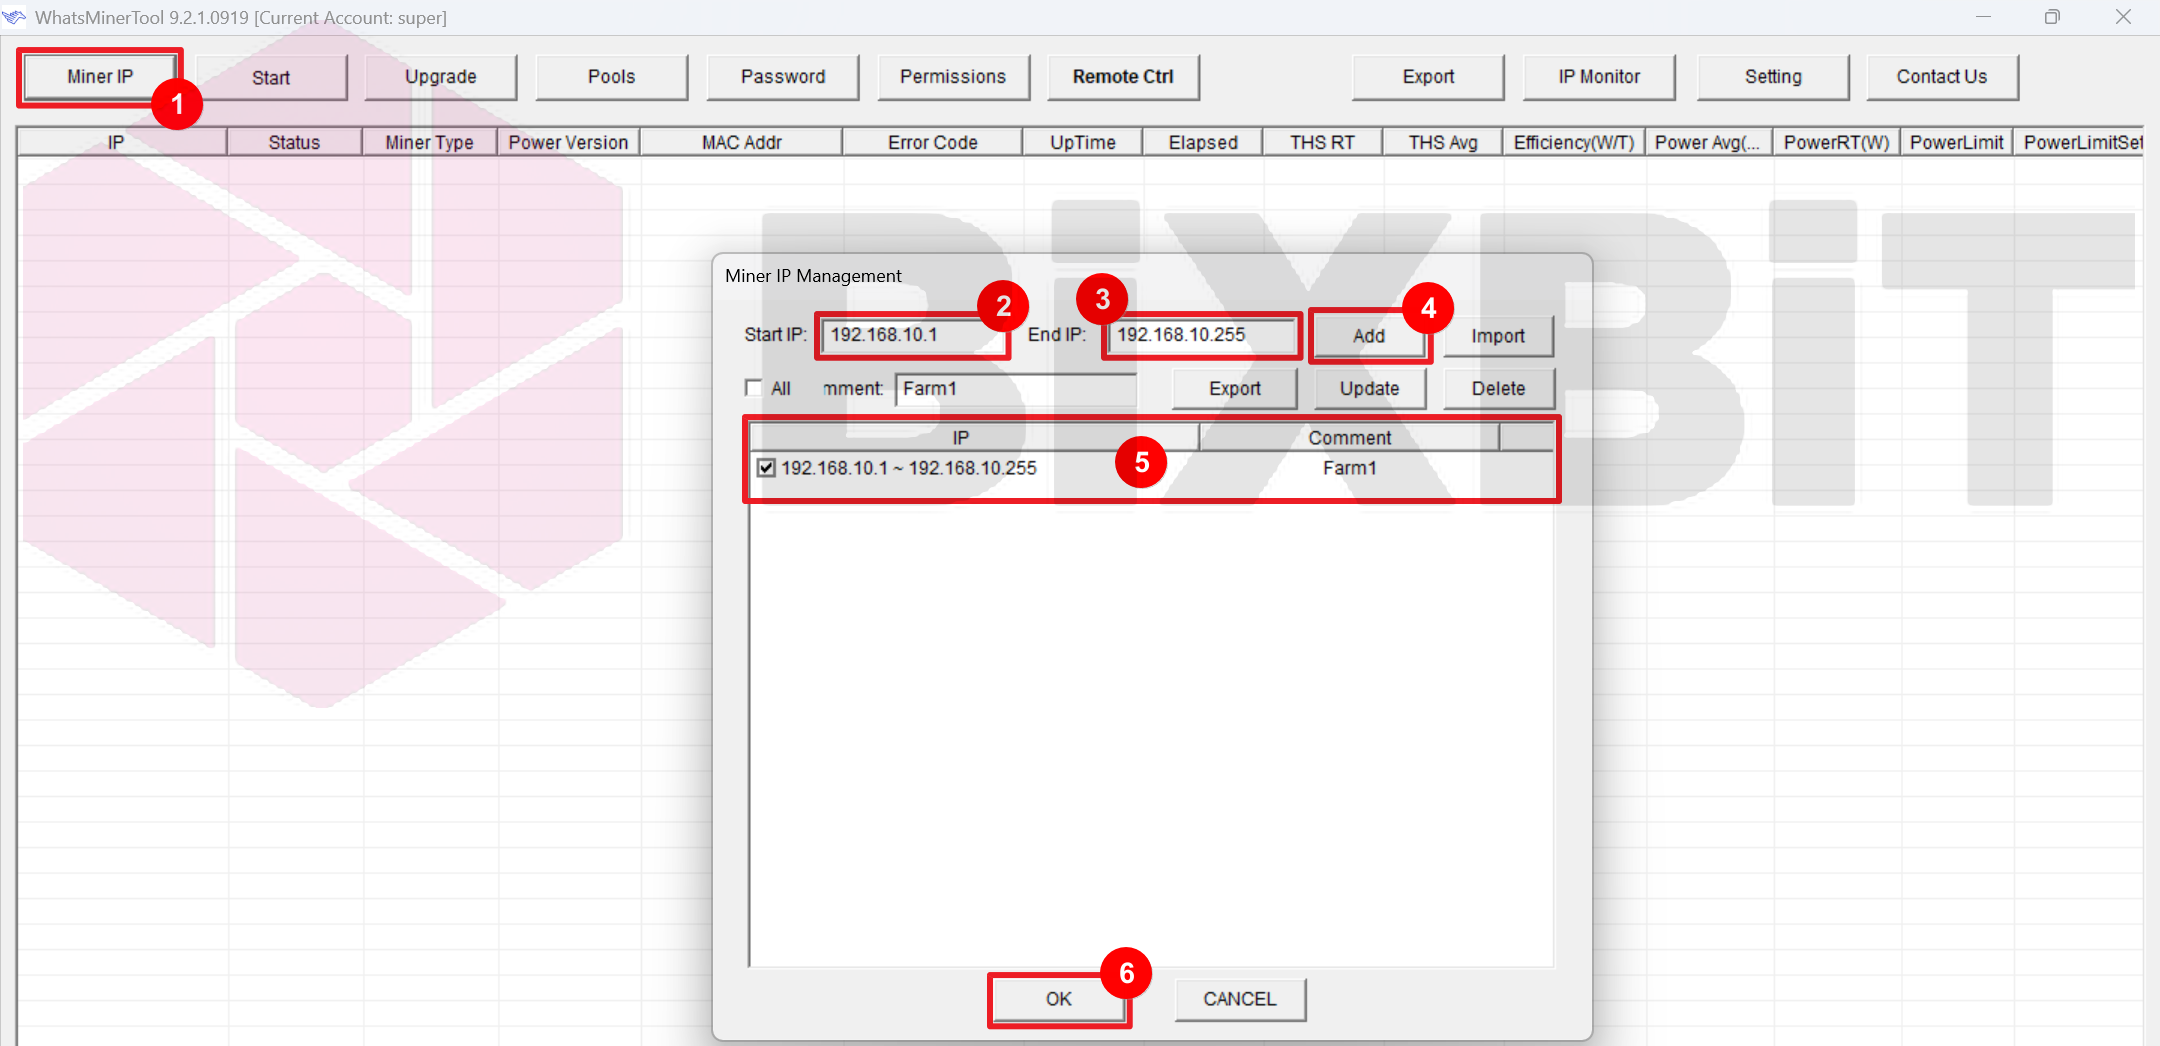
- Click [Miner IP] to open the Miner IP Management window ①. If there are already any entries in this window, you can delete them, modify them, or simply add new ones.
Let's add a new one:
- In the Start IP field ②, enter the IP address you obtained earlier, changing the last digit to "1" (e.g., 192.168.10.1).
- In the End IP field ③, enter the obtained IP address, changing the last digit to "255" (e.g., 192.168.10.255).
- Click the [ Add ] button ④.
- The entered range will appear in the list ⑤. Select the checkbox for the range you want to scan, and click [OK] ⑥.
Now you can start the network scan:
- In the main utility window, click [ Start ] ①.
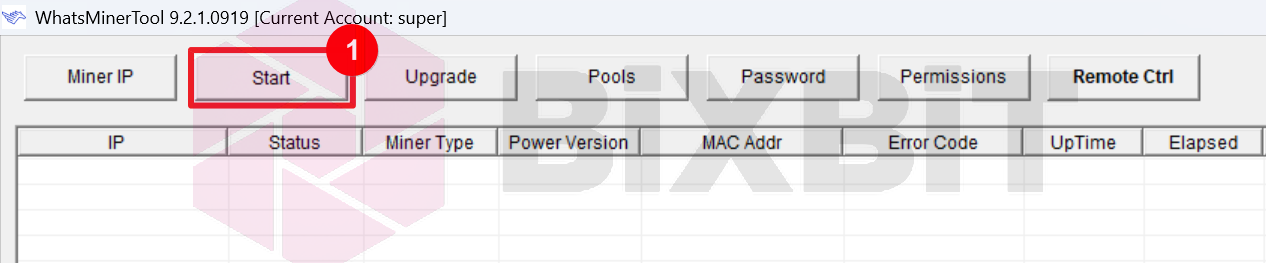
The button will change its name to "Monitoring", the scan will start, and after a while, the found devices will be displayed in the list.

For Antminer Devices:
To get started, you need to determine the IP address of the ASIC miner assigned by the router/modem. To do this:
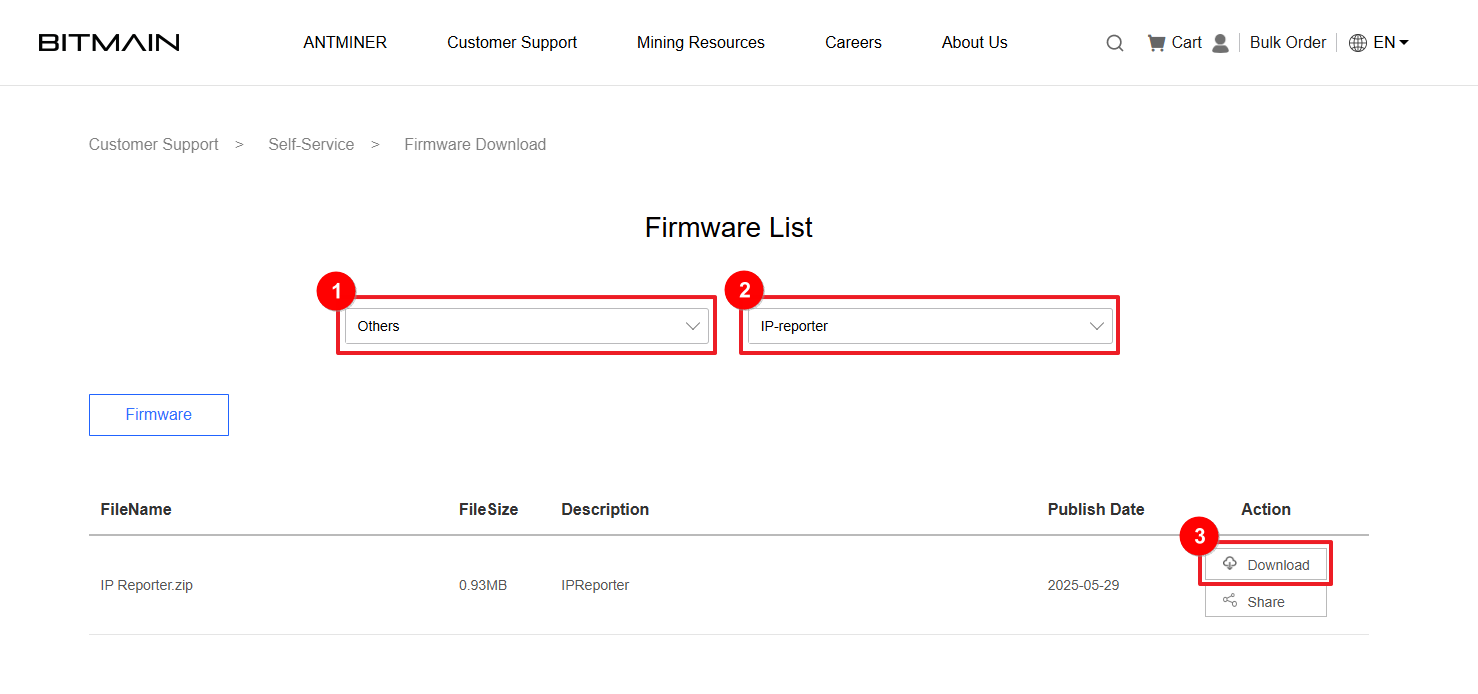
- Go to the link BITMAIN Shop, in the two dropdown lists select Others ① and IP-reporter ②. Then download the IP Reporter.zip archive by clicking the Download button ③.
- Run the IPReporter.exe utility.
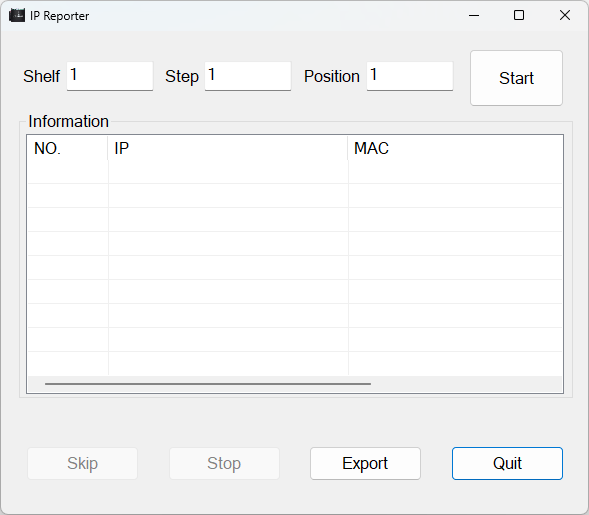
- Click the [Start] button ①.
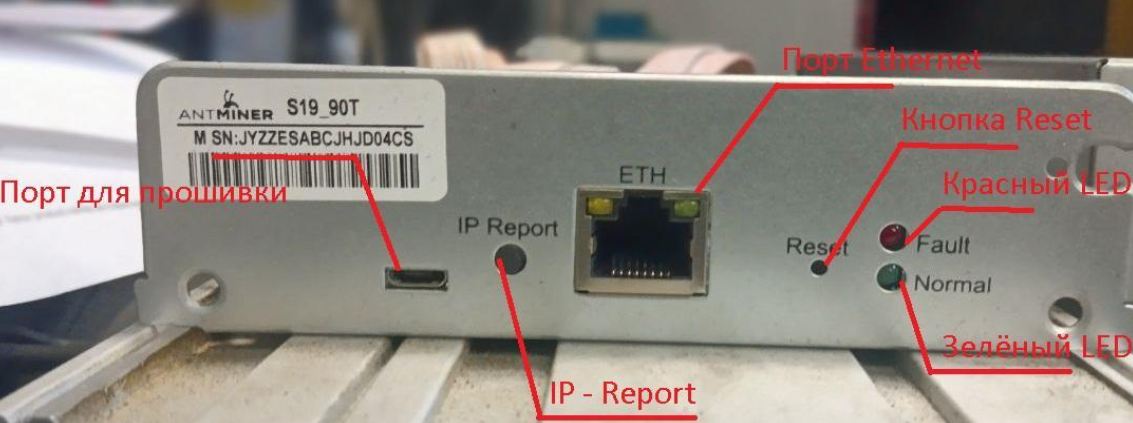
- On the control panel, press and hold the IP Report button until it beeps (about 5 seconds).
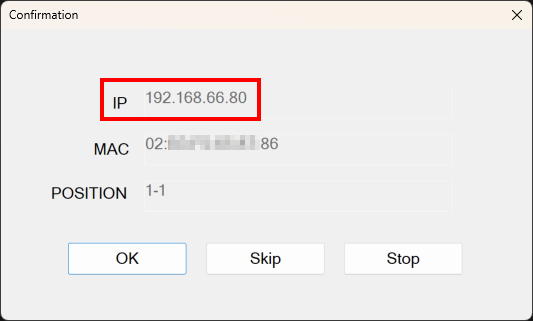
- The IP address will be displayed on your screen.
- Enter the obtained IP address into your browser's address bar.
- Log in to the device's web interface using the default credentials - root/root.
INFO
You can change the device's IP address or choose a different IP assignment method (from DHCP to static or vice versa). To do this:
- Go to the [IP Setting] section.
- In the Protocol field, select the IP address assignment method.
- If you select Static, enter the IP address, subnet mask, gateway, and DNS server.
- Click [Save].
Configuring Pools and Workers
- Pool addresses and the worker name are obtained from the pool itself; the coin type is any supported by your pool based on the SHA-256 algorithm. The password and suffix are optional.
- To avoid equipment downtime, it is not recommended to specify three identical pool addresses. In case of a connection loss, the device will attempt to switch to the same unavailable address, which will not solve the problem. It is recommended to specify three different pool addresses. Using addresses from different pools, not just one, is allowed — this increases connection reliability and reduces the risk of downtime.
- Pools in the device configuration are processed in the order they are specified: from first to last. If connection to the first pool fails, the device automatically moves to the next one on the list. This process continues until a connection is successfully established or all available pools are exhausted.
- If after changing pools the device does not connect to the new pool and continues working with the old one — perform a Reboot of the device.
For Whatsminer Devices:
Configuration via WhatsminerTool:
- In the WhatsMinerTool window, after scanning the network and detecting the device, click the [Pools] button ①.
- Enter the pool address, worker name, suffix, password, and coin type in the corresponding fields ②. You can configure one or more pools as needed.
- Select the IP addresses of the devices on which you want to apply the entered pool settings. You can select multiple devices ③.
- Click [Start Upgrade] ④.
- After the dialog box appears, click [OK] to complete the configuration.

- To hide the pool configuration form, click the [ Pools ] button ① again.
INFO
- Click [Fixed Pools Input] to save the pool address you entered. Then, when configuring this same pool for other devices, you won't need to enter it again; it will be available in the dropdown list.
- Click [Set Pool Only] to change only the pool without altering the worker configuration, suffix form, password, coin type, and other parameters.
- Using suffixes is especially useful with a large number of devices — they allow you to track the profitability of each individual worker, whether it's a single device or a group of devices, on the mining pool. Suffix configuration options:
- No-suffix – without a suffix. Convenient if you have a single device.
- Custom suffix – user-defined suffix. Adds a suffix entered by the user in the corresponding field to the worker.
- IP-suffix – automatically adds the device's IP address to the worker name. The number of octets (parts of the IP address) automatically added to the worker is configured in the Setting section, in the IP Suffix Count field.
- Custom with IP – a combination of the IP-suffix and Custom suffix options.
Configuration via the Device's WEB Interface:
This method is suitable for devices with stock firmware and BiXBiT firmware.
- Open the miner's IP address in your browser (e.g., https://192.168.88.96) and enter the username / password set on the device (default is admin / admin).
- Go to section ① Configuration > Miner Configuration, tab Pool.
- To set up the pool, in the dropdown menu for Pool 1 ②, select --custom--. An input field will appear instead of the dropdown menu.
- Fill in the newly appeared field, as well as Pool1 worker and Pool1 password ③.
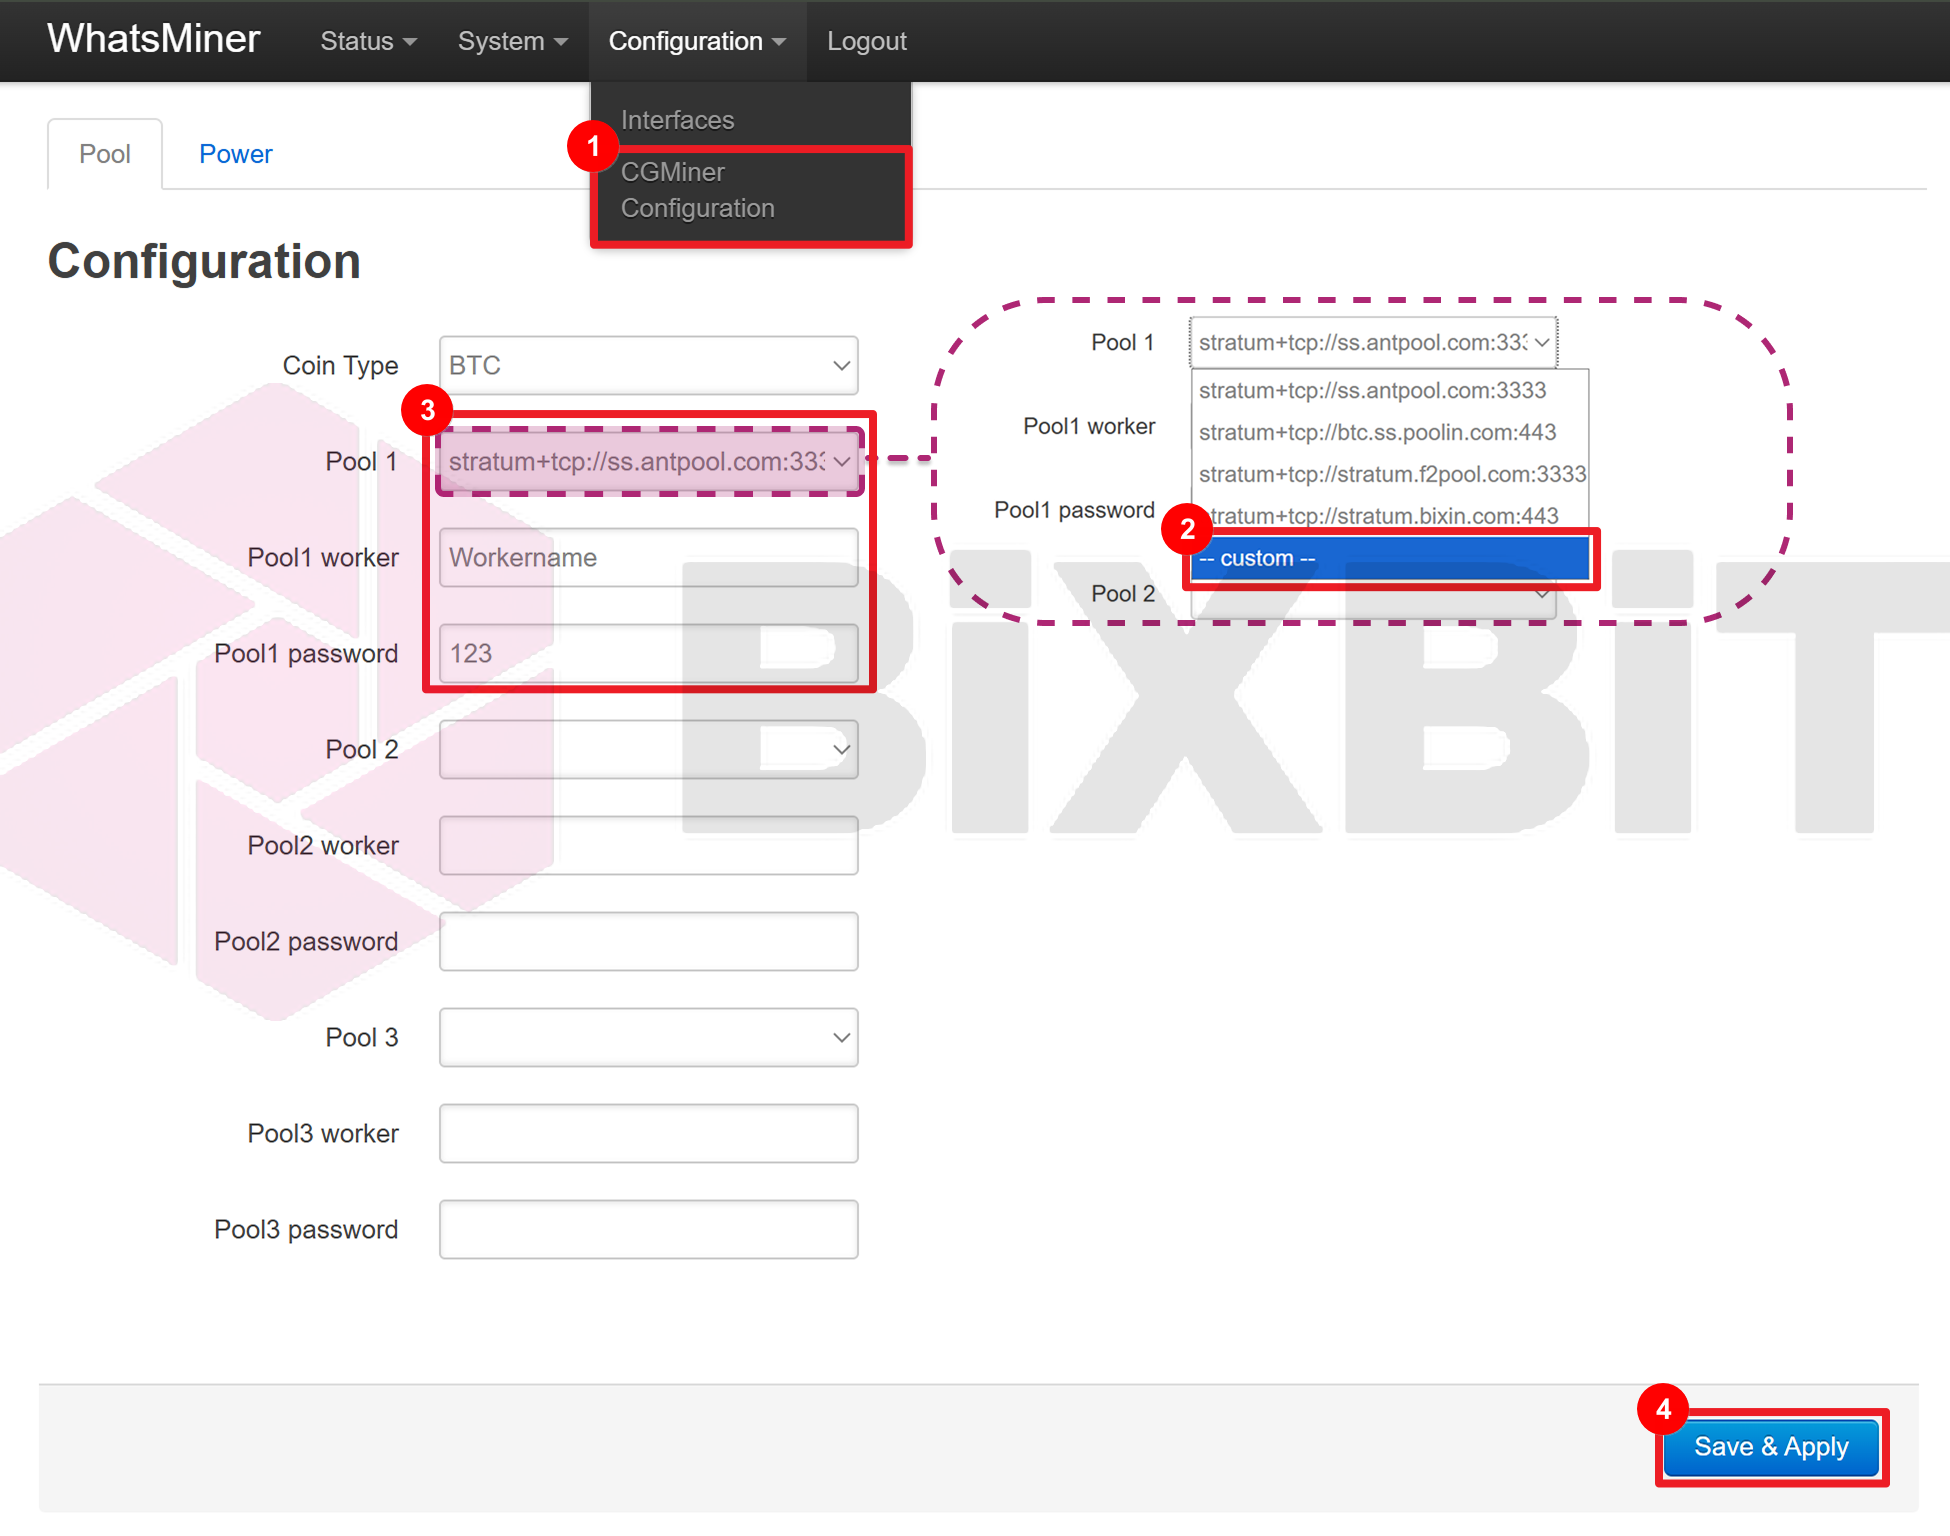
- If necessary, set up Pool 2 and Pool 3 in the same way.
- Click [ Save & Apply ] to save the settings.
INFO
After changing pools, you need to reboot the miner.
For Antminer Devices:
Configuration via BTC Tools:
- Download the latest version of BTC Tools: https://btc-tools.org/. After downloading the archive, extract its contents into a separate folder. Launch BTC Tools by double-clicking on “BTCTools-vx.x.x.exe”.
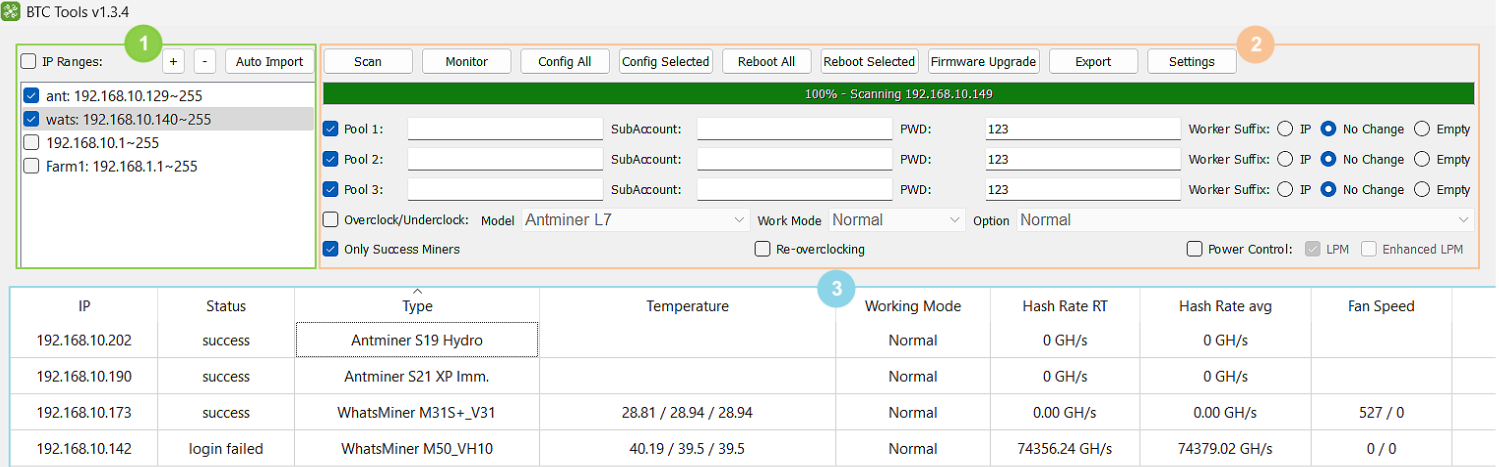
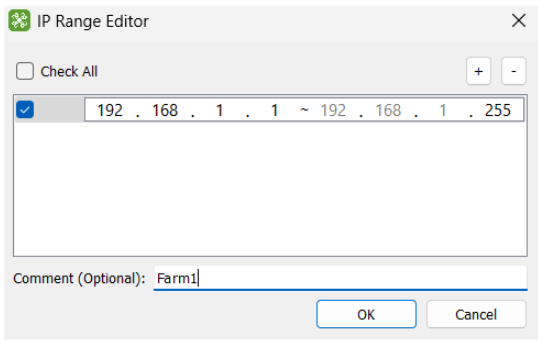
- In the IP Ranges section, set the IP address range for scanning that includes your device's IP address. To do this, click the [+] button, which will open the IP Range Editor dialog window. Set the starting and ending IP addresses, then click the [OK] button.
- After setting up, saving, and selecting the IP range using the IP Ranges function, click [Scan] or [Monitor] to start scanning:
- [Scan] – starts a scan of the selected ranges (one-time snapshot of the range).
- [Monitor] – continuously scans the selected IP ranges at the specified Monitor Interval.
- Wait for your device to be detected and for the network scan to finish. Then you can proceed to configure the pools. Enter the required data in the corresponding fields:

- Pool 1/2/3 - pool address/stratum.
- SubAccount - worker.
- PWD - password (optional).
- Worker Suffix - suffix configuration options:
- [IP] – automatically adds the device's IP address to the worker name. The number of automatically added octets is configured in the BTC Tools settings.
- [No Change] – suffix configuration will not be changed (default).
- [Empty] – without a suffix.
Configuration via the Device's WEB Interface on Stock Firmware:
- Click on [Settings] on the left side of the web interface.
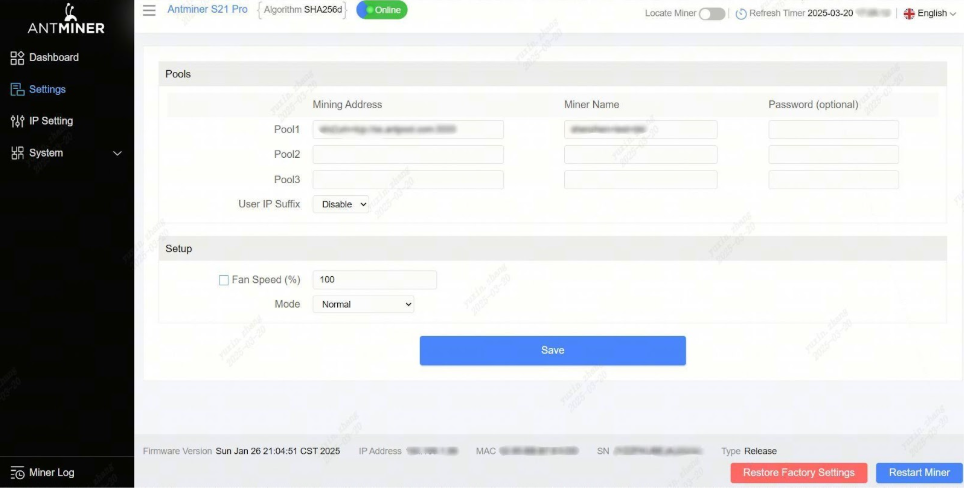
- Enter the mining pool data in the corresponding fields: Mining Address - pool address/stratum, Miner Name - worker, Password - password (optional).
- Click [Save] to apply the settings.
Configuration via the Device's WEB Interface on BiXBiT Firmware:
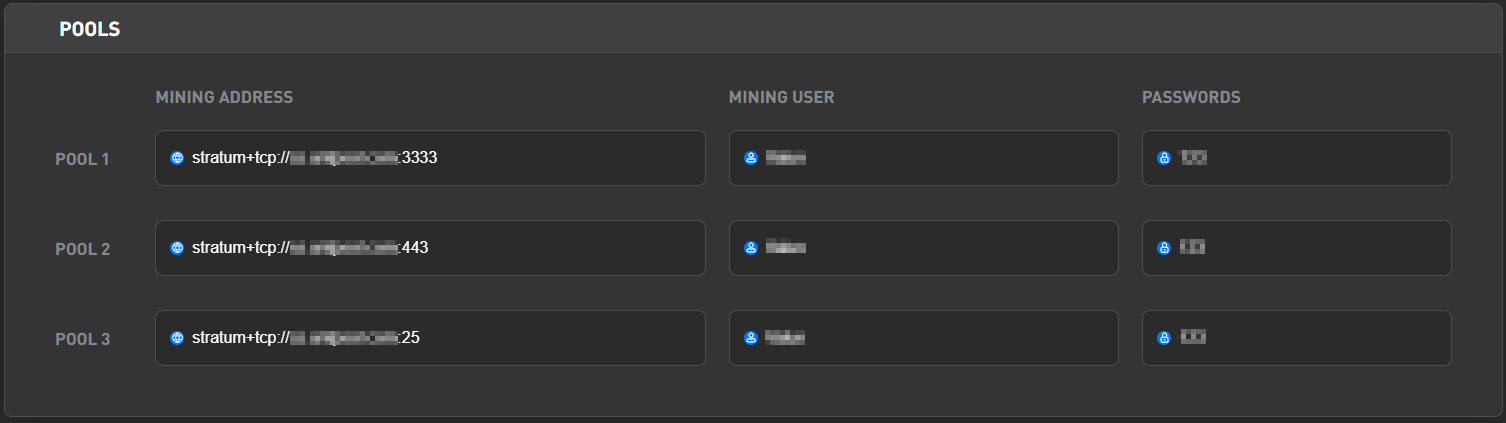
- Click on [Settings] on the left side of the web interface.
- On the [Setup] settings tab, in the POOLS section, enter the mining pool data in the corresponding fields: MINING ADDRESS - pool address/stratum, MINING USER - worker, PASSWORDS - password (optional).
- Click [Save] to apply the settings.